Terraform - A Complete Begineer Guide

What is Terraform?
Terraform is an infrastructure management tool developed by HashiCorp helps you provision manage and maintain cloud resources like Servers, Networking, Storage etc by means of centalized code.
Terraform is a tool/command line program we run to define and make changes to our infrastructure. Terraform is also a language that defines those changes.
The phrase “Infrastructure as Code” (IaC) is frequently used by DevOps specialists. It involves using machine-readable specification files to manage and provision the entire IT infrastructure, which includes both physical and virtual machines. It takes an operations-focused software engineering strategy. With the use of computer scripts, the entire data centre can be automated.
Advantages of Terraform
Supports multiple providers such as AWS, Azure, GCP, DigitalOcean and many more
Provide immutable infrastructure where configuration changes smoothly
Uses easy to understand language, HCL (HashiCorp configuration language)
Easily portable to any other provider.
Terraform Core concepts:
Variables: Also used as input-variables, it is key-value pair used by Terraform modules to allow customization.
Provider: It is a plugin to interact with APIs of service and access its related resources.
Module: It is a folder with Terraform templates where all the configurations are defined
State: It consists of cached information about the infrastructure managed by Terraform and the related configurations.
Resources: It refers to a block of one or more infrastructure objects (compute instances, virtual networks, etc.), which are used in configuring and managing the infrastructure.
Data Source: It is implemented by providers to return information on external objects to terraform.
Output Values: These are return values of a terraform module that can be used by other configurations.
Plan: It is one of the stages where it determines what needs to be created, updated, or destroyed to move from real/current state of the infrastructure to the desired state.
Apply: It is one of the stages where it applies the changes real/current state of the infrastructure in order to move to the desired state.

How Terraform Works?
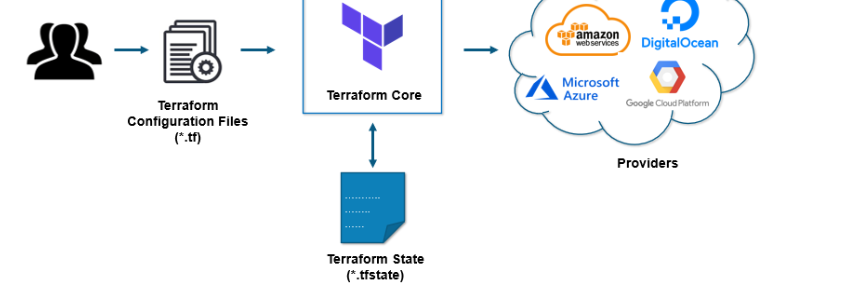
Terraform has two main components that make up its architecture:
Terraform Core
Providers

Providers:
The providers for particular technologies make up the second part of the architecture. This could be an infrastructure as a service platform or a cloud provider like AWS, Azure, or GCP. It is also a provider for more high-level components like Kubernetes or other platform-as-a-service tools, even some software as a self-service tool.
As an illustration, build an AWS infrastructure, install Kubernetes on top of it, and then build services and other components for the Kubernetes cluster.
Each of the more than a hundred providers that Terraform has for various technologies grants users access to those resources. You may therefore access hundreds of AWS resources like EC2 instances, AWS users, etc. through an AWS provider, for instance. You have access to commodities, resources, such as services, deployments, and namespaces, etc., through the Kubernetes provider.
Terraform attempts to assist you with provisioning and covering the entire application configuration, from infrastructure to application, in this manner.
HANDS ON FOR TERRAFORM WITH AWS
Creating and Managing S3 Buckets Using Terraform.
Step 1: Create an S3 Bucket using Terraform
To create an S3 bucket using Terraform, define the following resource block in your Terraform configuration file:
resource "aws_s3_bucket" "my_bucket" {
  bucket = "devopschallenge-s3-bucket"
}
Step 2: Configure Public Read Access
To configure the S3 bucket to allow public read access, add the following resource block:
# Allow public read acces
resource "aws_s3_bucket_public_access_block" "public_access_block" {
  bucket = aws_s3_bucket.my_bucket.id
  block_public_acls       = false
  block_public_policy     = false
  ignore_public_acls      = false
  restrict_public_buckets = false
}
Step 3: Create an S3 Bucket Policy for IAM User or Role
To create an S3 bucket policy that allows read-only access to a specific IAM user or role, modify the existing bucket policy resource block as follows:
# Bucket policy to allow read-only access to the devops-user
resource "aws_s3_bucket_policy" "my_bucket_policy" {
  bucket = aws_s3_bucket.my_bucket.id
  policy = jsonencode({
    Version = "...."
    Statement = [
      {
        Sid    = "AllowUserAccess"
        Effect = "Allow"
        Principal = {
          AWS = "arn:aws:iam::974262444728:user/imsurendar"
        }
        Action   = "s3:GetObject"
        Resource = "${aws_s3_bucket.my_bucket.arn}/*"
      }
    ]
  })
}
Step 4: Enable Versioning
To enable versioning for the S3 bucket, add the following resource block:
# Enable versioning for the S3 bucket
resource "aws_s3_bucket_versioning" "bucket_versioning" {
  bucket = aws_s3_bucket.my_bucket.id
  versioning_configuration {
    status = "Enabled"
  }
}
This resource block enables versioning, which allows you to keep multiple versions of an object in your S3 bucket.
Step 5: Execute Terraform
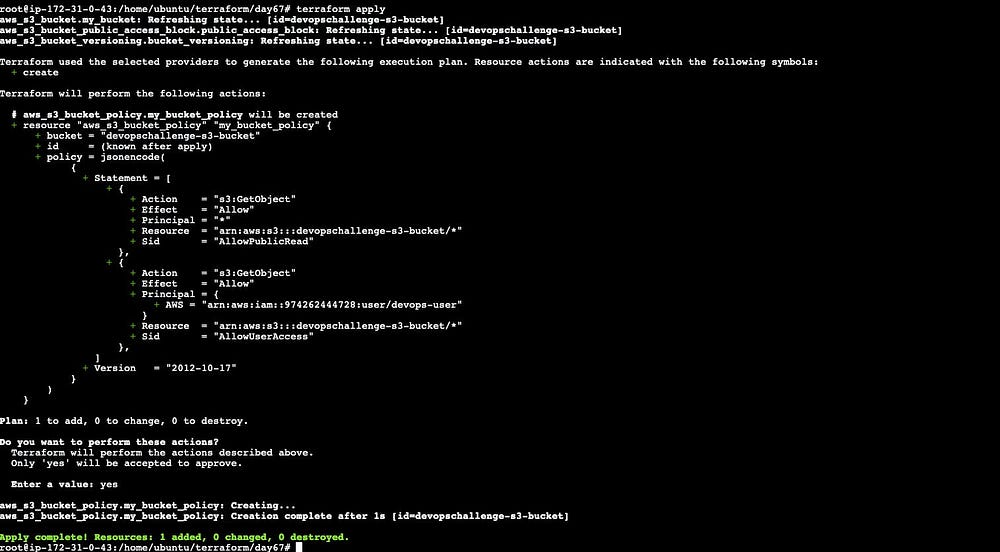
Run terraform init, terraform plan, and terraform apply to create the above infrastructure.
Step 6: Validate the infrastructure
Navigate to the S3 Dashboard and verify if the S3 Bucket created allows public read access and if bucket versioning is enabled.


By following these steps, you will be able to create and manage S3 buckets in AWS using Terraform. Take advantage of the flexibility and scalability offered by S3 to meet your storage needs effectively.
Thanks for reading .
Blogger: Surendar Sv
